

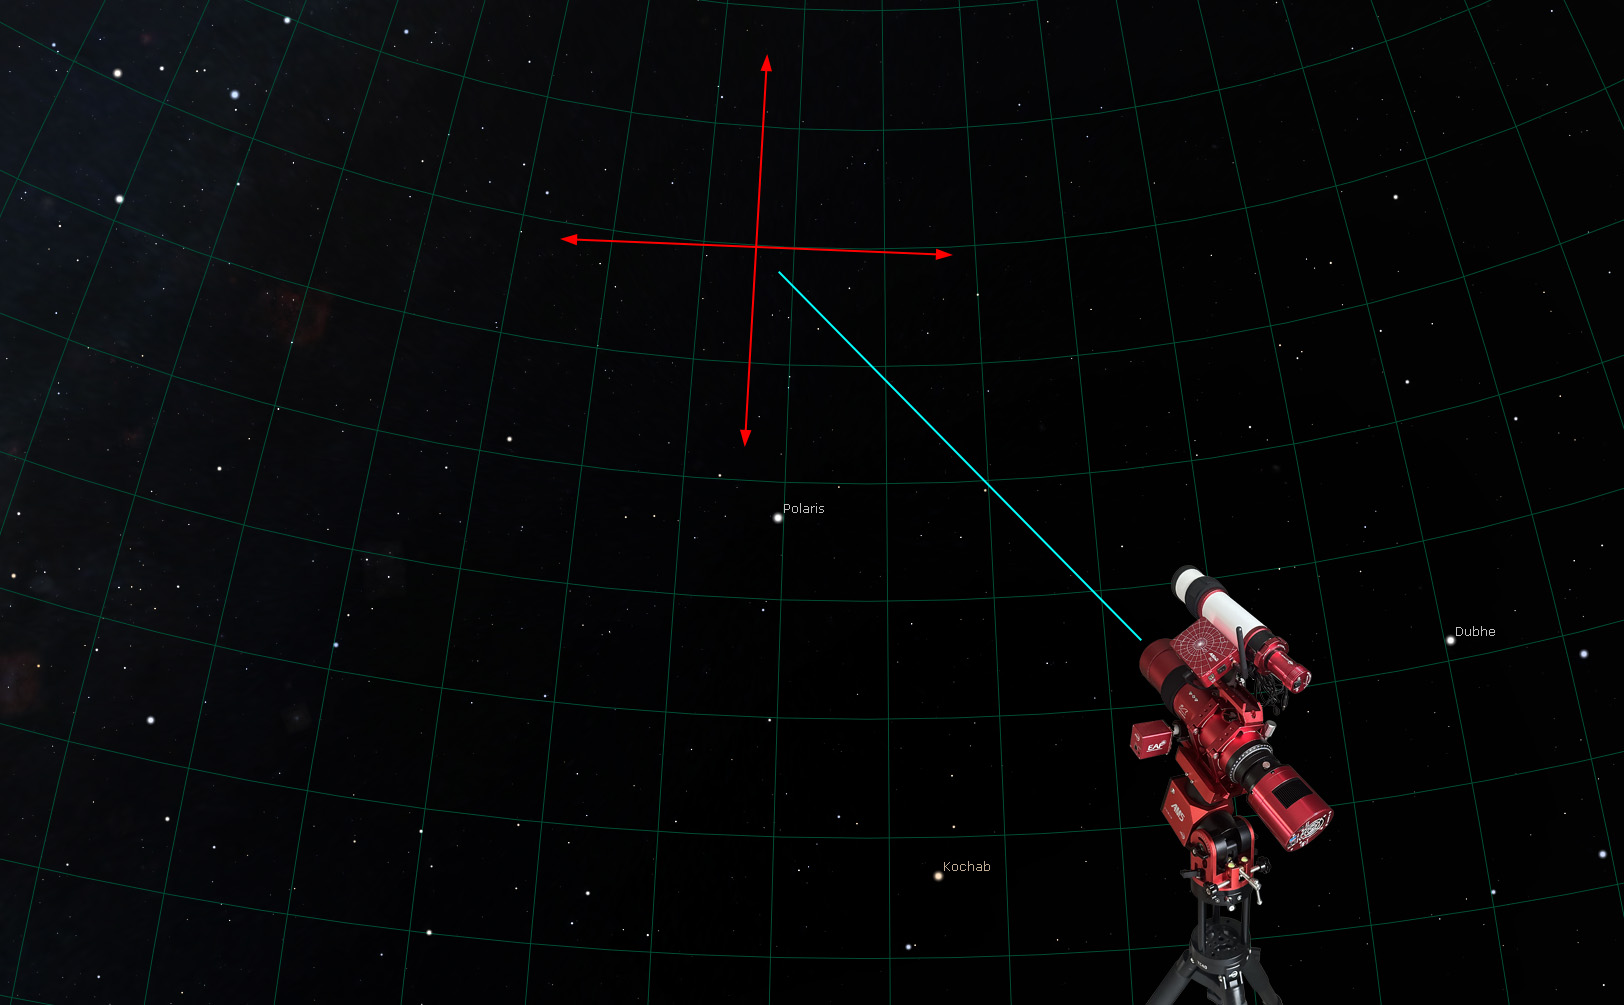
How the rig works together
Gold paths show photons entering the two telescopes. Cyan paths show the control loop: the guide camera reports star movement to the ASIAIR, which coordinates the imaging camera, focuser, and AM5 mount.
- Gold
- Starlight
- Cyan
- Data + corrections
- Guiding precision
- ~0.4 arcsec RMS
Telescope
Glass and Mirrors
There are two main types of telescopes used in astronomy: reflectors and refractors. Both have their strengths and trade-offs, and each serves different needs depending on whether you're observing visually or capturing images.
Reflectors
Reflector telescopes use mirrors to gather and focus light. A large concave primary mirror collects incoming light and reflects it toward a secondary mirror, which then directs it to a focal point - usually where the camera or eyepiece sits. This design allows for larger apertures at a more affordable price, making reflectors great for viewing or photographing faint and distant objects like galaxies and nebulae.
However, reflectors typically require more maintenance and setup. The mirrors can fall out of alignment and need to be collimated (realigned) regularly for the best performance. They're also open-tube designs, which means dust and dew can become an issue, especially in humid or dusty environments.
Refractors
Refractor telescopes use lenses instead of mirrors. Light passes through a series of precision-ground glass elements that bend and focus it onto the camera sensor or eyepiece. Because the optical tube is sealed, refractors are more resistant to environmental conditions - they stay cleaner, rarely require adjustment, and are generally more beginner-friendly in terms of maintenance.
High-quality refractors, especially those designed for astrophotography, can get expensive - particularly as the aperture increases. But they produce sharp, high-contrast images with tight, color-corrected stars and minimal distortion, especially when paired with a field flattener or Petzval design.
For visual astronomy, I use a 12-inch Dobsonian reflector - a fantastic light bucket that's perfect for casually observing planets, clusters, and galaxies. But for astrophotography, I've stuck with a compact refractor for now. The simplicity, portability, and crisp wide-field performance make it a perfect fit for my imaging style and suburban observing conditions.
My Telescope
I use a William Optics RedCat 61 refractor. It is designed for wide-field astrophotography and produces sharp images across the frame, keeping stars crisp and round from the center to the edges.
Key Specs:
- Aperture: 61mm
- Focal Length: 300mm
- Focal Ratio: f/4.9
- Optical Design: Apochromatic Refractor
Camera
The Basics
Astrophotography cameras are very different from everyday cameras - even high-end DSLRs. While traditional cameras are designed to shoot fast, handheld images in well-lit environments, astrophotography cameras are built to capture faint light over long periods, often in near-total darkness. This specialized gear allows us to pull stunning detail from objects that would otherwise be invisible to the human eye.
Below are some of the key features that set astrophotography cameras apart, and the factors I considered when choosing my own.
Cooling
One of the most important features in a dedicated astrophotography camera is cooling. Unlike daylight photography, where exposure times are fractions of a second, astrophotography involves long exposures - often several minutes per frame. As the camera sensor heats up during these long exposures, it introduces thermal noise that can ruin the image.
Cooled astro cameras use thermoelectric cooling to bring the sensor temperature well below ambient conditions - typically to -10°C or lower. This reduces noise significantly and makes each frame cleaner, giving much better results during stacking and post-processing.
In astrophotography, my goal is to capture as much signal as possible - the faint light from deep-sky objects - while keeping the noise (unwanted interference) as low as possible. This balance is called the signal-to-noise ratio, or SNR.
Take a look at the image below to understand how noise can affect an image and why it is important to maximize the SNR:
 BeforeAfter
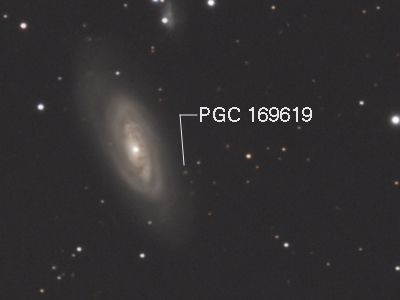
This is an image of Messier 90, a spiral galaxy located in the constellation Virgo. The photo on the left contains a noticeable amount of noise, while the version on the right has significantly less.
Both images identify a small background galaxy, PGC 169619. It is difficult to spot in the noisier version because the background interference masks its faint light. In the cleaner version, the improved signal-to-noise ratio makes the galaxy stand out much more clearly against the background sky.
You can also see finer structure in the spiral arms of Messier 90 itself. This is the benefit of camera cooling - by reducing thermal noise, we preserve the delicate detail in deep-sky objects and make it possible to detect faint stars or galaxies that might otherwise be lost.
Color vs Mono
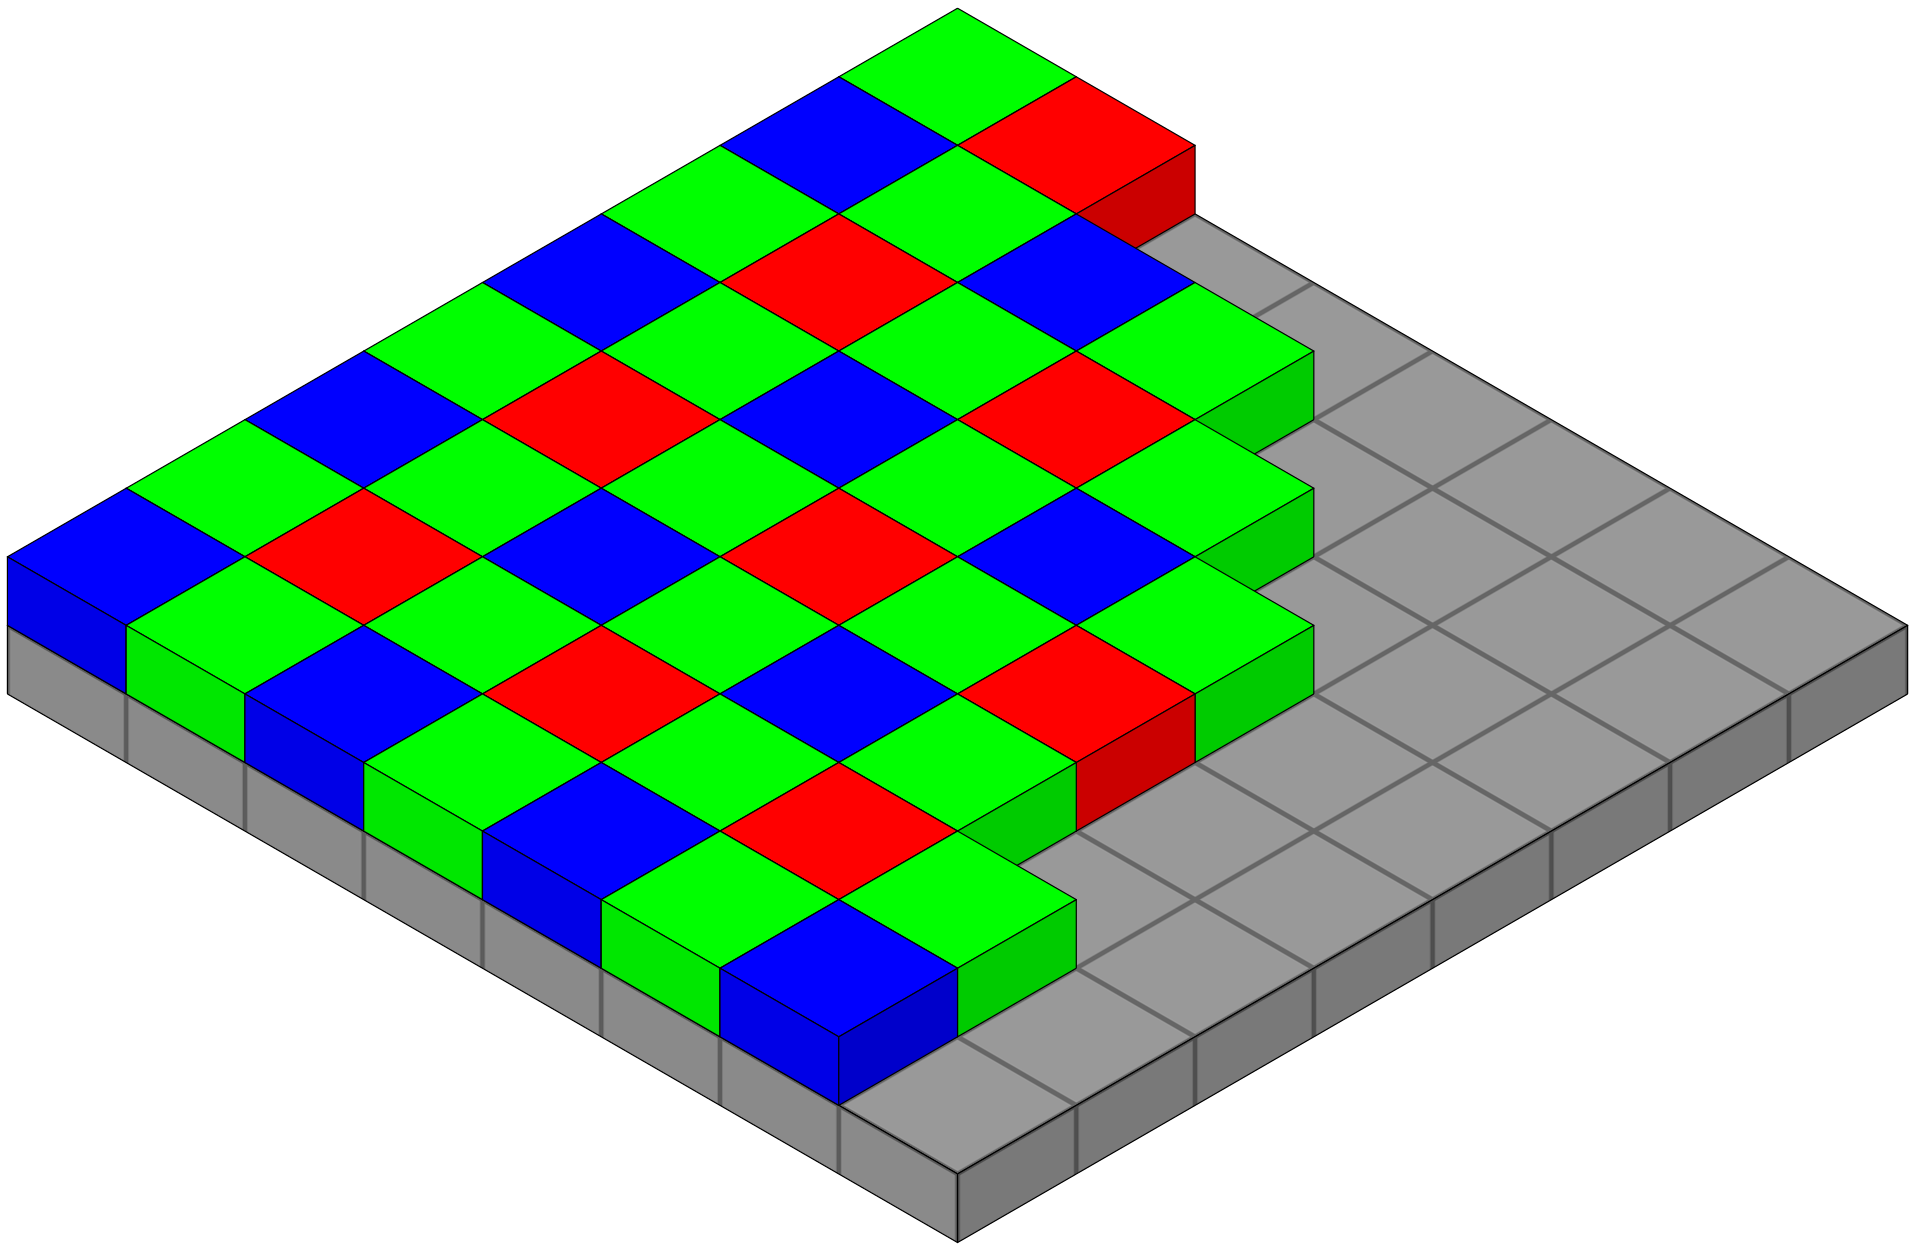
Astrophotography cameras come in two main types: one-shot color (OSC) and monochrome (mono).
- Color (OSC) cameras have a built-in Bayer filter matrix that allows them to capture red, green, and blue light in one exposure - just like a normal camera. They're simpler to use and great for beginners or for capturing quick, vibrant images without needing multiple filters.
- Monochrome cameras record all light intensity and require separate filters (usually RGB and narrowband) to build a full-color image. They're more complex and time-consuming, but offer better detail, flexibility, and signal-to-noise ratio, especially for narrowband imaging.
Monochrome cameras offer maximum control and detail, while OSC cameras offer simpler operation and faster setup.
Typical RGGB Bayer Pattern on an OSC Camera
 Filter pattern
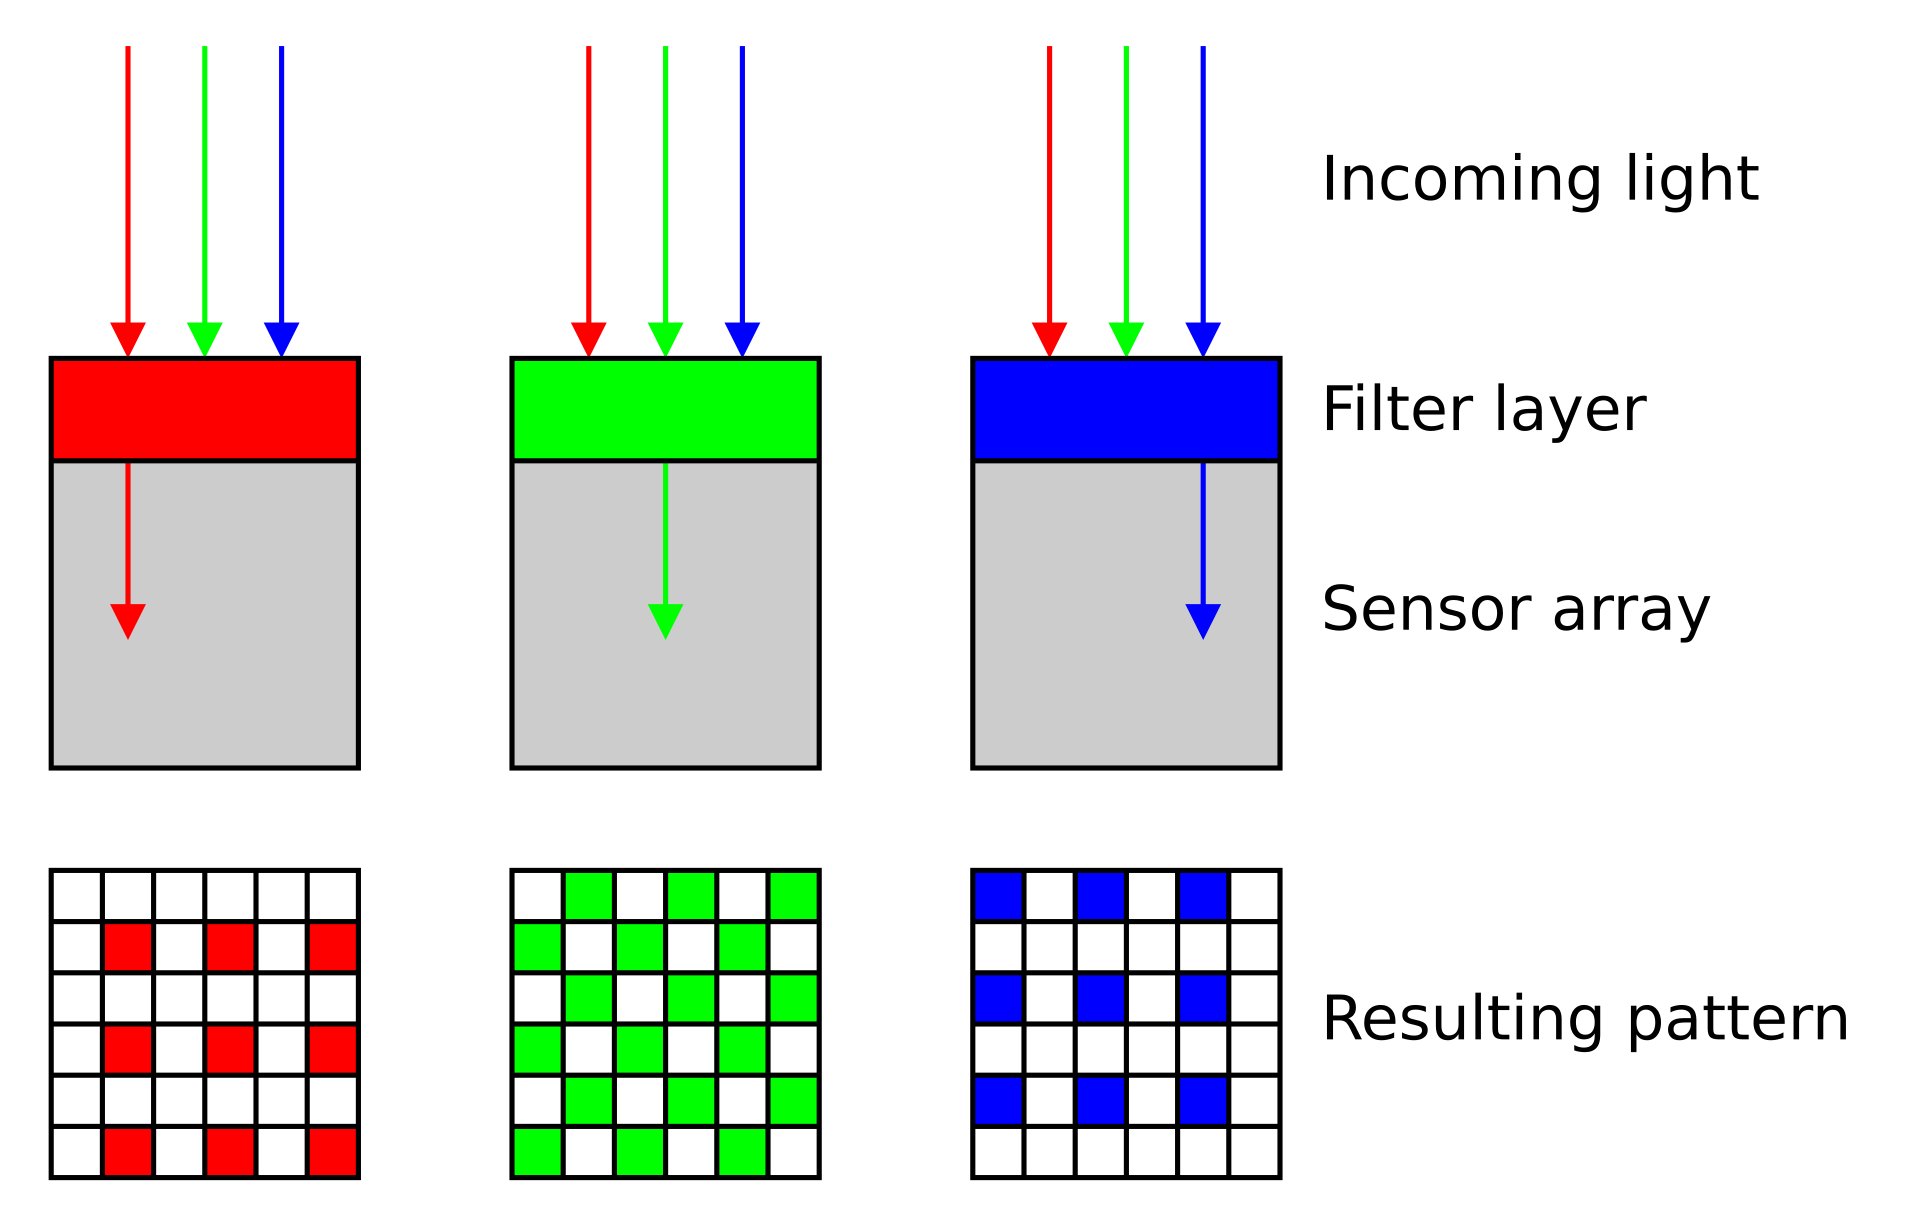 Sensor profile
Sensor Size and Resolution
Just like in traditional photography, the sensor size and pixel resolution matter in astrophotography too. Larger sensors (like APS-C or full-frame) provide wider fields of view, which are great for large nebulae and sweeping Milky Way scenes. Smaller sensors can offer higher magnification when paired with longer focal length telescopes - better for galaxies and planetary targets.
Pixel size also plays a role. Smaller pixels give higher resolution but may be noisier or less sensitive. It's all about finding the right balance between field of view, resolution, and light sensitivity.
Other Features
- Bit depth: A 16-bit camera can record 65,536 brightness levels per channel, preserving smooth gradients and giving me more room to process faint detail.
- Back-illuminated sensor: Improves low-light sensitivity.
- Quantum efficiency (QE): Measures how efficiently incoming photons are converted into signal.
- Amp-glow control: Minimizes or corrects electronic glow during long exposures.
My Camera
The camera is one of the most important pieces in any astrophotography setup. Instead of capturing a single image like a regular DSLR, astrophotography cameras take dozens - often hundreds - of long exposures that are later stacked and processed to reveal faint details hidden in the night sky.
I use the ZWO ASI2600MC Pro, a cooled, one-shot color (OSC) camera designed specifically for deep-sky astrophotography. It pairs perfectly with my refractor telescope, offering a large field of view, low noise, and beautiful color reproduction - all without needing to manage multiple filters or a filter wheel.
Key Specs
- Sensor: APS-C format (26.1 MP)
- Pixel Size: 3.76μm - a good balance of resolution and sensitivity
- Bit Depth: 16-bit for smooth gradients and high dynamic range
- Cooling: Thermoelectric cooling down to -10°C or lower
- Back-Illuminated Sensor: Improves low-light performance and efficiency
- QE (Quantum Efficiency): ~80% peak - excellent for faint targets
Mount
A Moving Sky
In astrophotography, the telescope gets all the attention - but it's the mount that quietly does the most critical job: keeping everything pointed precisely at your target as Earth rotates. Even the sharpest telescope and best camera will produce blurry images if the mount can't track the sky accurately over long exposures.
Types of Mounts
The most common mount for casual stargazing is an altitude-azimuth (Alt-Az) mount, which moves the telescope up and down in altitude and left and right in azimuth. These mounts are simple to use and easy to point. My 12-inch Dobsonian is an Alt-Az telescope that I can move by hand to any target. However, this design does not follow the sky's rotation around the celestial pole, so long exposures develop field rotation.
Equatorial mounts, on the other hand, are designed to track the stars by rotating along the same axis as Earth. Once polar aligned (more on that soon!), they follow a target smoothly as it moves across the sky. These are the go-to choice for most astrophotographers because they allow for long, accurate exposures without rotation artifacts.
Some mounts, like mine, can switch between both modes - giving you the best of both worlds.
Alt-Az
Equatorial
 Alt-Az
 Equatorial
Accuracy and Tracking
The accuracy of a mount is measured by how closely it can follow a star's motion. Most astrophotography mounts use precise motors and encoders to make fine adjustments, but even high-end mounts can still experience tiny errors - especially over long exposures. That's why I use autoguiding: a secondary camera and scope monitor a guide star and make real-time corrections during imaging (see the next section on guiding).
The more accurate the mount, the longer you can expose without needing corrections - which leads to sharper stars and better data.
My Mount
I use the ZWO AM5, a cutting-edge mount that combines precision with portability. Unlike traditional mounts that rely on gear-driven mechanisms, the AM5 uses a strain wave drive system - similar to what's found in professional robotic arms. This makes it exceptionally smooth and nearly backlash-free, which translates to accurate, quiet tracking.
One of the best parts of the AM5 is that it doesn't require a counterweight for smaller payloads like mine, making setup much faster and easier - especially when I'm imaging on the go.
Specs:
- Weight: ~11 lbs
- Payload Capacity: 28 lbs without a counterweight; 44 lbs with a counterweight
- Mount Type: Equatorial and Alt-Azimuth
Guiding
A Moving Sky
Capturing long-exposure images of deep-sky objects requires a level of tracking accuracy that even the best mounts can't sustain on their own. While most equatorial and alt-azimuth mounts can follow the stars reasonably well, small imperfections in gears, balance, or alignment inevitably lead to tracking drift - causing stars to streak and fine details to blur.
That's where autoguiding comes in. A secondary camera and scope lock onto a guide star and send continuous tracking corrections to the mount. These tiny adjustments, often less than an arcsecond, keep the imaging camera precisely aligned during exposures lasting several minutes.
Guide Camera and Telescope
I use a ZWO ASI174MM Mini guide camera. This monochrome camera is sensitive and fast, allowing the guiding system to detect and correct tracking deviations quickly.
For the guide scope, I use a William Optics 50 mm model. Mounted parallel to the main telescope, it provides a wide field of view for locating guide stars, while its RotoLock mechanism holds the guide camera securely.
Accuracy
With this setup, I routinely achieve guiding precision of around 0.4 arcseconds RMS. That tiny error is small enough to keep stars round through long exposures, even as the sky keeps moving.
That level of precision is what makes deep-sky astrophotography possible. It's how I capture fine detail in galaxies, nebulae, and star clusters, even over long, stacked exposures - pixel by pixel, tracked across the night sky.